The Course Import Wizard is the preferred method for uploading new courses. To access it, go to Wizards > Course Import Wizard in the Administrator's Console or click on the Add or Update a New Course icon in the Administrator's home page.
If you have a specific course ID that should be used, be sure that it is set in the properties of the course files. To ensure that the course ID has been set, look at the imsmanifest file for SCORM courses, the course ID should be shown in the identifier element of resource. For AICC courses, look at the Course_ID field in the .crs file.
If the course ID is not initially set as part of this upload, it can always be set through the Maintain Learning Resources screen once the course has been created.
If your course has been translated into multiple languages, only use the Course Wizard to upload the course files for the default language (typically English). The course files for all additional languages must be uploaded through the File Manager in Maintain Learning Resources.
See the help topic Uploading Translated Course Files for step by step instructions on how to do this.
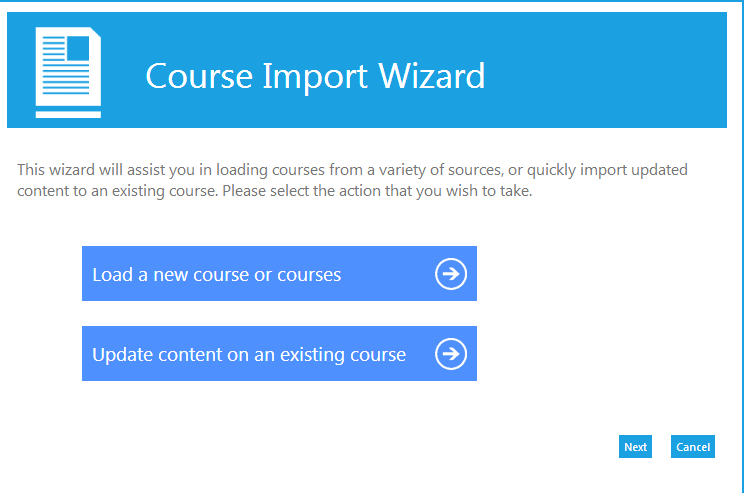
To import course files, open the Course Import Wizard, and select the option Load a new course or courses.
Select the correct type of course file(s) and click Next:
Click the Upload button on the next page and navigate to the course zip file from your computer.
Please ensure that the name of the uploaded file does not contain the following special characters: \ / : * ? " < > | & #
If the uploaded file name contains these characters, users may experience a blank black screen when they launch the file.
If you are uploading multiple course files, the package must have each course in its own folder. Then all of the individual folders should be zipped together into one zip file for uploading.
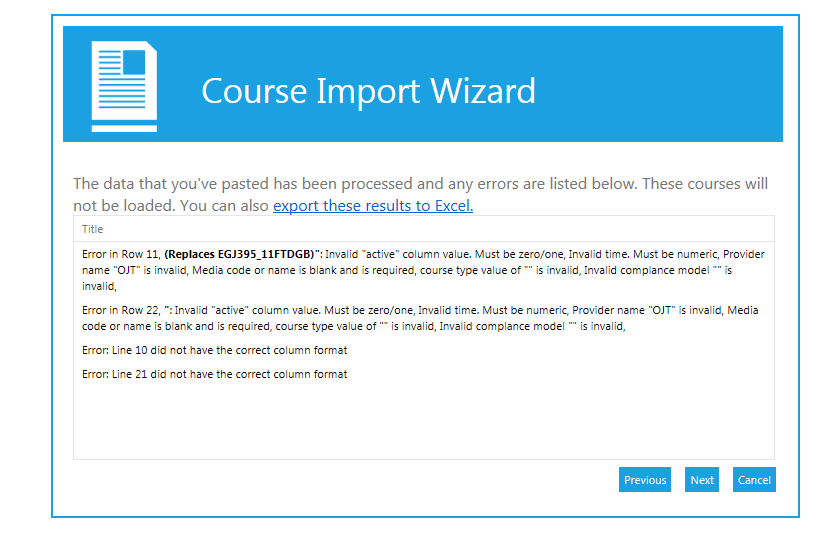
Once all of the files have been uploaded, the LMS will show you which courses were loaded and any errors that were encountered.
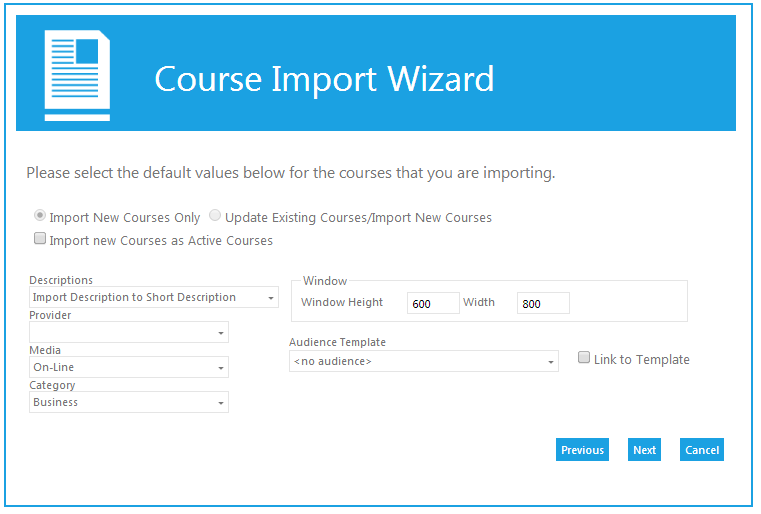
On the next screen, choose your default values:
If all of the uploaded course files are for new courses, keep the default of “Import New Courses only.”
If you are uploading both existing and new courses, be sure that the course number is in the course files of the existing course files. If the LMS does not see an existing course number, it will assume that all of the course files are for new courses and will automatically disable the “Update Existing Courses/Import New Courses” option.
The uploaded course files should contain the course description. You can import that into the short description field, long description field, or both.
Select a Provider, Media type, and course Category if desired. These can also be set through the Maintain Learning Resources screen once the upload is complete. If you are going to wait to add some settings, you should not import the course as Active.
If you would like to set the Primary audience for this course using an Audience Template, you can select the template here and then check the Link to Template box.
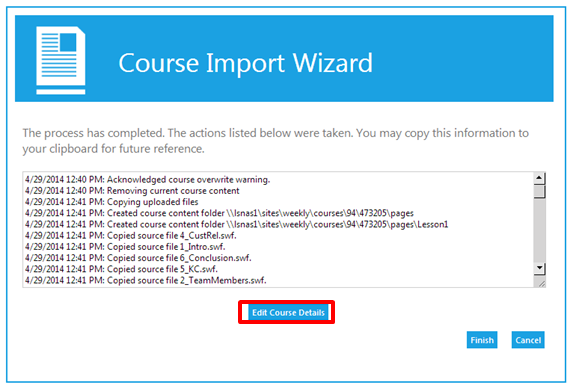
The final confirmation page will show you how the courses have imported. If you need to make additional edits to the new course, for example, set the audience, click the Edit Course Details button to go directly to this resource in Maintain Learning Resources and make any necessary changes.
The Edit Course Details button will be inactive if multiple course files were loaded.
The Course Import Wizard is the preferred method for uploading new courses. To access it, go to Wizards > Course Import Wizard in the Company Administrator menu or click on the Add or Update a New Course icon in the Company Administrator home page.
The course import template must be used when creating new 3rd party courses or other non-eLearning courses. The template is also useful for uploading courses (both eLearning and non-eLearning) that are needed only for historical purposes.
The template should follow this format:
|
Column |
Header |
Description |
|---|---|---|
|
A |
Course Name |
Required
|
|
B |
Course ID |
Optional
|
|
C |
Short Description |
Optional
|
|
D |
Long Description |
Required
|
|
E |
Course Objectives |
Optional
|
|
F |
Keywords |
Optional
|
|
G |
Active |
Required
|
|
H |
Estimated Time |
Required
|
|
I |
Estimated Time (text) |
Required
|
|
J |
Provider |
Required
|
|
K |
Recommendations |
Optional
|
|
L |
System Requirements |
Optional
|
|
M |
Media Type |
Required
|
|
N |
Score Model |
Required Enter one of the following values to define when the course should be marked complete:
|
|
O |
Course Type |
Optional Enter the Course Type ID. Options are:
|
|
P |
Launch URL |
Optional Enter the launch URL. This is typically only applicable when creating 3rd party courses. |
|
Q |
Audience Description |
Optional
|
|
R |
Price |
Optional Enter the participant cost for the course. Cost must be entered in the following format: 1.00 |
|
S |
Compliance/ Standards Model |
Required Enter the compliance model for this course. Options are:
|
In the template there are fields for the course provider ID and the media type ID. Both of these ID numbers are different for each and every system, so the easiest way to find these numbers for your system is to create an ad hoc report.
To create this report, go to Reports > Administer Reports in the Administrator menu. The columns for the report should include:
The provider IDs can also be found on the Maintain Providers screen, listed under Tools on the Administrator menu.
Once the template is complete, follow these steps to upload the courses into your system.
Open Course Import Wizard and select the option Load a new course or courses. On the next screen, select the option Import Courses from Excel/Clipboard and click Next.
If you have created your template in the standard Excel format, select “Tab” (default) as the Separator type.
On the next screen, you will be pasting the data from Excel. If you are going to include the header row, leave the box checked indicating this. If the header row will not be included, uncheck this box.
If any information was entered incorrectly or if required information is missing, the wizard will alert you to this fact. Common Errors include: Incorrect information, missing required information, and data in the wrong format.
On the next screen, you can select the appropriate import option based on the data in your course upload. You can choose either “Import New Courses Only” or “Update Existing Courses/Import New Courses.”
If you would like to set the Primary audience for this course using an audience template, you can select the template on the next screen and then check the “Link to Template” box. If not, skip the audience template section.
The system will confirm the number of courses that you are about to upload. Click Next to complete the upload.
There is a final confirmation screen letting you know that the upload was successful. Click Finish to close the Wizard.
Once the upload is complete, you may want to go to Maintain Learning Resources to set the audience and any other additional information about the course.
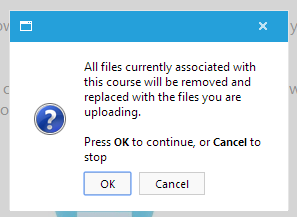
In addition to uploading new course files, the Course Import Wizard can also be used to upload updated course files to an existing course. When this process is used, the Wizard will automatically remove all (including all languages) of the previous course files for the selected course.
If your system utilizes advanced resource permissions, only a company administrator or the course owner will be able to update an existing course.
To process these updated course files:
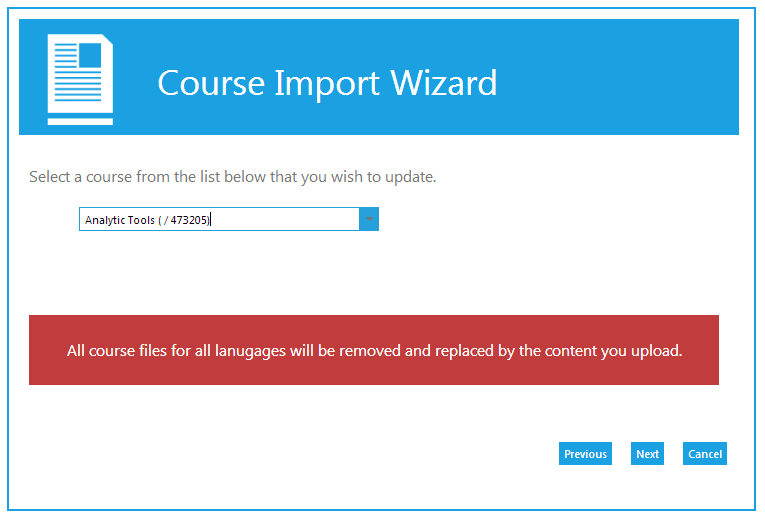
Go to the Course Import Wizard, and select the option “Update content on an existing course.”
Begin typing in the name of the course that is going to be updated. Select the correct course when the title appears and click Next.
The LMS will warn you that all previous course files will be removed. Click OK to continue.
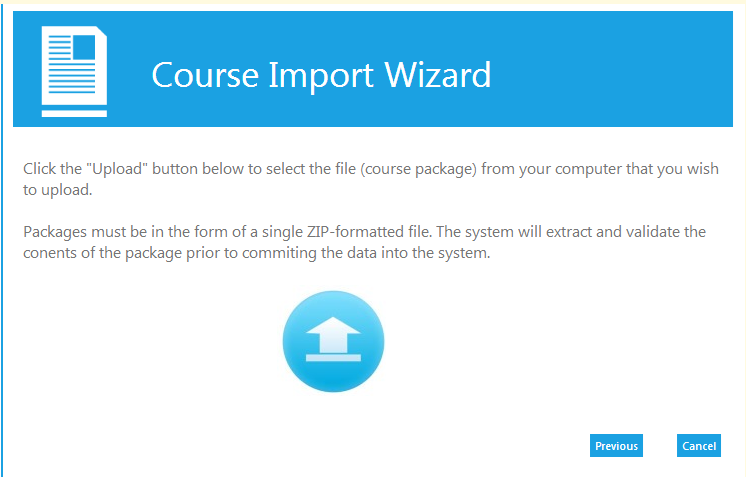
Upload the zip file containing the new course files.
Once the zip file has been successfully loaded, the LMS will confirm that the process has been completed. If you need to make additional edits to this course, click the Edit Course Details button to access the edit resource screen on Maintain Learning Resources.
If no additional changes need to be made, click Finish.